
[Android] Floating Action Button 만드는 방법 (Kotlin)
카테고리: Android
이전 블로그(velog)에서 옯겨 온 글입니다.
Floating Action Button
플로팅 작업 버튼(FAB)는 앱 UI의 기본 작업을 트리거하는 원형 버튼이다. 화면을 움직여도 FAB 버튼은 화면의 최상위에 고정되어 떠다닌다. (_안드로이드 디벨로퍼 설명 페이지)
build.gradle
build.gradle(project:~)
1
2
3
4
5
6
allprojects {
    repositories {
      google()
      jcenter()
    }
  }
google()이 있는지 확인, 없으면 추가
build.gradle(module:~)
1
2
3
4
5
dependencies {
    // ...
    implementation 'com.google.android.material:material:<version>'
    // ...
  }
Google’s Maven Repository 에서 최신 버전을 확인하고 추가 한뒤, sync now!
레이아웃 xml
1
2
3
4
5
6
7
8
9
10
11
12
13
14
15
16
17
18
19
20
21
22
23
24
25
26
27
28
29
30
31
32
33
34
35
36
37
38
39
40
41
42
43
44
45
46
47
48
<?xml version="1.0" encoding="utf-8"?>
<androidx.constraintlayout.widget.ConstraintLayout xmlns:android="http://schemas.android.com/apk/res/android"
    xmlns:app="http://schemas.android.com/apk/res-auto"
    xmlns:tools="http://schemas.android.com/tools"
    android:layout_width="match_parent"
    android:layout_height="match_parent">

    <ImageView
        android:id="@+id/imageView"
        android:layout_width="match_parent"
        android:layout_height="match_parent"
        app:srcCompat="@drawable/base_map" />

    <com.google.android.material.floatingactionbutton.FloatingActionButton
        android:id="@+id/fab_share"
        android:layout_width="wrap_content"
        android:layout_height="wrap_content"
        android:layout_margin="24dp"
        android:layout_marginEnd="24dp"
        android:src="@drawable/baseline_share_black_48"
        app:layout_constraintBottom_toBottomOf="@+id/fab_main"
        app:layout_constraintEnd_toEndOf="@+id/fab_main"
        app:layout_constraintStart_toStartOf="@+id/fab_main"
        app:layout_constraintTop_toTopOf="@+id/fab_main" />

    <com.google.android.material.floatingactionbutton.FloatingActionButton
        android:id="@+id/fab_capture"
        android:layout_width="wrap_content"
        android:layout_height="wrap_content"
        android:layout_margin="24dp"
        android:layout_marginEnd="24dp"
        android:src="@drawable/baseline_add_photo_alternate_black_48"
        app:layout_constraintBottom_toBottomOf="@+id/fab_main"
        app:layout_constraintEnd_toEndOf="@+id/fab_main"
        app:layout_constraintStart_toStartOf="@+id/fab_main"
        app:layout_constraintTop_toTopOf="@+id/fab_main" />

    <com.google.android.material.floatingactionbutton.FloatingActionButton
        android:id="@+id/fab_main"
        android:layout_width="wrap_content"
        android:layout_height="wrap_content"
        android:layout_margin="24dp"
        android:layout_marginEnd="24dp"
        android:layout_marginBottom="24dp"
        android:src="@drawable/baseline_add_black_48"
        app:layout_constraintBottom_toBottomOf="parent"
        app:layout_constraintEnd_toEndOf="parent" />
</androidx.constraintlayout.widget.ConstraintLayout>
- FAB 크기는
app:fabsize: mini, normal 지정 안하면 default - FAB 리플 색상은
app:rippleColor- 리플 색상을 지정하면 (
app:rippleColor="@color/purple_500")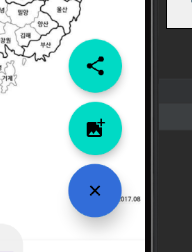 버튼을 눌렀을때 색이 나타난다.
- 리플 색상을 지정하면 (
- FAB 아이콘은
android:src- 나는 drawble에 png 파일을 가져와서
android:src="@drawable/"파일이름"으로 사용했다.
- 나는 drawble에 png 파일을 가져와서
- Material Design 페이지를 보면, FAB 버튼은 세가지가 있는데
- 순서대로 Regular FAB, Mini FAB, Extended FAB 이다.
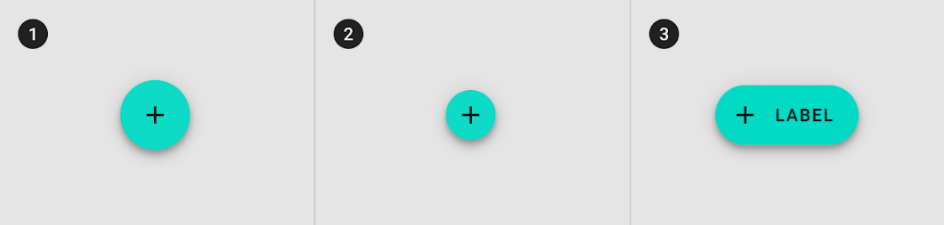
- 순서대로 Regular FAB, Mini FAB, Extended FAB 이다.
이벤트 설정 코드 (setOnClickListener)
1
2
3
4
5
6
7
8
9
10
11
12
13
14
15
16
private fun setFABClickEvent() {
        // 플로팅 버튼 클릭시 애니메이션 동작 기능
        _binding.fabMain.setOnClickListener {
            toggleFab()
        }

        // 플로팅 버튼 클릭 이벤트 - 캡처
        _binding.fabCapture.setOnClickListener {
            Toast.makeText(this.context, "캡처 버튼 클릭!", Toast.LENGTH_SHORT).show()
        }

        // 플로팅 버튼 클릭 이벤트 - 공유
        _binding.fabShare.setOnClickListener {
            Toast.makeText(this.context, "공유 버튼 클릭!", Toast.LENGTH_SHORT).show()
        }
    }
- viewBinding을 사용했고, 프래그먼트에서 뷰바인딩 사용하는게 (나한테는) 조금 까다로웠는데, 전체 코드도 아래에 첨부하니 참고하세요!
FAB 애니메이션 코드
1
2
3
4
5
6
7
8
9
10
11
12
13
14
15
16
private fun toggleFab() {
        Toast.makeText(this.context, "메인 버튼 클릭!", Toast.LENGTH_SHORT).show()
        // 플로팅 액션 버튼 닫기 - 열려있는 플로팅 버튼 집어넣는 애니메이션
        if (isFabOpen) {
            ObjectAnimator.ofFloat(_binding.fabShare, "translationY", 0f).apply { start() }
            ObjectAnimator.ofFloat(_binding.fabCapture, "translationY", 0f).apply { start() }
            ObjectAnimator.ofFloat(_binding.fabMain, View.ROTATION, 45f, 0f).apply { start() }
        } else { // 플로팅 액션 버튼 열기 - 닫혀있는 플로팅 버튼 꺼내는 애니메이션
            ObjectAnimator.ofFloat(_binding.fabShare, "translationY", -360f).apply { start() }
            ObjectAnimator.ofFloat(_binding.fabCapture, "translationY", -180f).apply { start() }
            ObjectAnimator.ofFloat(_binding.fabMain, View.ROTATION, 0f, 45f).apply { start() }
        }

        isFabOpen = !isFabOpen

    }
ObjectAnimator.ofFloat으로 애니메이션을 구현했다.- target에 view id
R.id.블라블라나 바인딩을 불러와준다. - PropertyName에는 애니메이션을 넣고자 하는 방향?을 설정해준다.
TranslationY는 상하방향,TranslationX는 좌우 방향 ( 감이 안와서 숫자 넣어가면서 맞는 값을 찾았다.View.ROTATION은 회전을 구현 할 수 있다. 45도를 돌렸다 원상복귀 할것이기 때문에 저렇게 설정 해 주었다.
- target에 view id
전체 소스코드
1
2
3
4
5
6
7
8
9
10
11
12
13
14
15
16
17
18
19
20
21
22
23
24
25
26
27
28
29
30
31
32
33
34
35
36
37
38
39
40
41
42
43
44
45
46
47
48
49
50
51
52
53
class MapFragment : Fragment(R.layout.fragment_map) {
    private lateinit var _binding: FragmentMapBinding
    private var isFabOpen = false // Fab 버튼 default는 닫혀있음

    private val binding get() = _binding!!

    override fun onCreateView(
        inflater: LayoutInflater,
        container: ViewGroup?,
        savedInstanceState: Bundle?
    ): View {
        _binding = FragmentMapBinding.inflate(inflater, container, false)
        return binding.root
    }

    override fun onViewCreated(view: View, savedInstanceState: Bundle?) {
        setFABClickEvent()
    }

    private fun setFABClickEvent() {
        // 플로팅 버튼 클릭시 애니메이션 동작 기능
        _binding.fabMain.setOnClickListener {
            toggleFab()
        }

        // 플로팅 버튼 클릭 이벤트 - 캡처
        _binding.fabCapture.setOnClickListener {
            Toast.makeText(this.context, "캡처 버튼 클릭!", Toast.LENGTH_SHORT).show()
        }

        // 플로팅 버튼 클릭 이벤트 - 공유
        _binding.fabShare.setOnClickListener {
            Toast.makeText(this.context, "공유 버튼 클릭!", Toast.LENGTH_SHORT).show()
        }
    }

    private fun toggleFab() {
        Toast.makeText(this.context, "메인 버튼 클릭!", Toast.LENGTH_SHORT).show()
        // 플로팅 액션 버튼 닫기 - 열려있는 플로팅 버튼 집어넣는 애니메이션
        if (isFabOpen) {
            ObjectAnimator.ofFloat(_binding.fabShare, "translationY", 0f).apply { start() }
            ObjectAnimator.ofFloat(_binding.fabCapture, "translationY", 0f).apply { start() }
            ObjectAnimator.ofFloat(_binding.fabMain, View.ROTATION, 45f, 0f).apply { start() }
        } else { // 플로팅 액션 버튼 열기 - 닫혀있는 플로팅 버튼 꺼내는 애니메이션
            ObjectAnimator.ofFloat(_binding.fabShare, "translationY", -360f).apply { start() }
            ObjectAnimator.ofFloat(_binding.fabCapture, "translationY", -180f).apply { start() }
            ObjectAnimator.ofFloat(_binding.fabMain, View.ROTATION, 0f, 45f).apply { start() }
        }

        isFabOpen = !isFabOpen

    }
}
이제 뷰바인딩 안쓰고는 못하겠다 ㅜㅜ findViewID,,R.id 부르는거 귀찮아.. 나중에 MVVM 에 대해서도 한번 정리 해봐야 겠다.
✨ 완성
.gif)
참고자료
- stickode.tistory.com
- 안드로이드 디벨로퍼
- 머터리얼 디자인
components/buttons-floating-action-button/android#extended-fabs)
댓글남기기